Converting a Dead Alcove into a High-Function Cloffice
Turn an unused hallway nook into a fully functional workspace using only modular shelving units that dismantle in minutes when your lease is up.

In 2026, the reality of urban renting means square footage is a luxury, and a dedicated spare room is a fantasy most of us have long since abandoned. The shift towards hybrid work hasn't disappeared; it has simply compacted. We are seeing a trend where workspaces are shrinking into vertical, highly organized niches rather than sprawling rooms. The challenge arises when you need to separate your professional life from your relaxation zone without violating a strict lease agreement.
I have worked with dozens of clients who attempt to solve this by folding tables out of closets, but those solutions invariably lead to back pain and clutter. The "cloffice"—a portmanteau of closet and office—is the superior solution, provided you execute it with modularity in mind. The goal here is not carpentry; it is curation. We are going to take a dead space, likely an awkward alcove in a hallway or bedroom, and turn it into a command center using off-the-shelf components that you can return to a cardboard box when moving day arrives.
The Geometry of Your Alcove
Before you buy a single screw, you must treat your nook as a construction zone. I have seen too many enthusiastic renters purchase a stunning desk only to find it blocks the flow of traffic or leaves no room for their knees. You need three precise measurements: the width, the depth, and the height.
For this project to work, your alcove needs to be at least 30 inches wide and 24 inches deep. If you have less than 24 inches of depth, standard office chairs will not fit without you having to splay your legs into the hallway. If your nook is shallow, consider abandoning the task chair for a low-profile backless stool on casters. This trade-off saves space but sacrifices lumbar support, so be honest about how long you sit at your computer.
Mark the floor with painter's tape to outline the footprint of your future workspace. Live with these tape lines for 48 hours. Walk past them, open the adjacent doors, and visualize the chair being pulled out. If the tape impedes your movement, shrink the footprint until it doesn't. This step saves you the logistical nightmare of returning heavy furniture.
Selecting the Right Modular Components
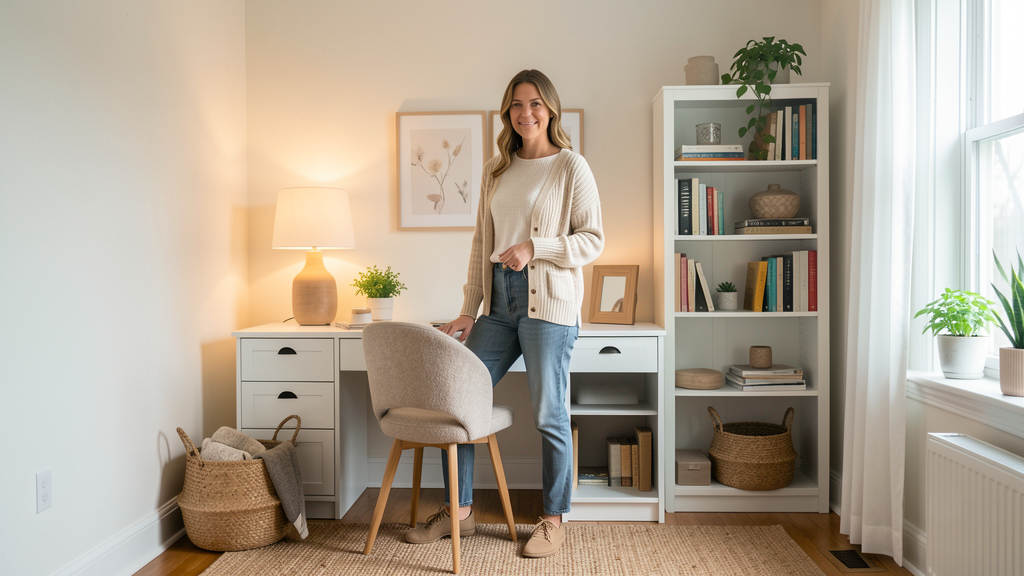
The core of this design relies on vertical storage towers. We are skipping wall-mounted floating shelves because they require anchors and leave holes—a lease violation waiting to happen. Instead, we will use two narrow, freestanding modular bookcases. These act as the structural "legs" of your office.
Look for units that are roughly 12 to 15 inches deep and stand at least 60 inches tall. Wire grid shelving is excellent for this because it is lightweight, industrial-chic, and incredibly easy to dismantle. Alternatively, laminate cube organizers offer a cleaner, warmer look. The key is finding two units that are identical in height.
When selecting your finish, consider the existing trim in your rental. If you have white baseboards, white units will make the cloffice disappear into the wall, creating a built-in illusion. If you are aiming for a moodier vibe, you might explore recreating the 'Quiet Luxury' Aesthetic Using Only IKEA Basics by opting for matte black or wood-foil finishes that ground the space.
Assembly and Flooring Protection
Once your units arrive, resist the urge to assemble them in the living room. Build them directly inside the alcove if possible, or assemble them just outside and slide them in. The most common mistake I see is neglecting the floor. Your landlord will check for scratches when you move out.
Before placing the heavy units, lay down a heavy-duty felt rug pad or a clear vinyl chair mat cut to size. If you want to add warmth, layer a distinct rug on top. I often recommend 4 High-End Designer Rugs and Their Exact Dupes Under $50 to clients who want the look of a Moroccan Beni Ourain without the $800 price tag. A 2x3 or 3x5 rug defines the workspace physically and visually, signaling to your brain that you are entering "work mode."

Position your two modular units. They should be spaced apart to create a knee hole. The distance between the two towers depends on your chair width, but generally, 28 to 30 inches is sufficient. Ensure the units are level. If your rental floors are notoriously uneven, use adhesive furniture pads to shim the front or back legs until the units don't wobble.
Installing the Desktop Surface
Now for the moment of truth: creating the desk. You are not buying a desk; you are buying a "bridge." You need a flat surface that spans the distance between your two modular units. A solid core door slab is the classic budget hack, but it can be heavy and visually clunky. Instead, visit your local hardware store and have them cut a sheet of whitewood or sanded plywood to your exact specifications.
Your cut should be the total width of the two units plus the gap between them, plus an additional 2 inches on either side for an overhang. The depth should match the depth of your units (usually 12 to 15 inches) plus a slight overhang.
Lay this board across the top of your units. Gravity is doing the work here. For extra security, you can use a small bead of clear adhesive caulk or heavy-duty double-sided mounting tape on the top corners of the bookcases. This ensures the surface stays put during vigorous typing sessions but can be pried off without damaging the furniture. If you are using a lightweight board, consider adding L-brackets inside the units to support the weight, but only screw them into the furniture, never the wall.
Lighting and Cable Management
A dark alcove kills productivity. You cannot rely solely on the ceiling light in the hallway. Since you cannot hardwire sconces, battery-operated puck lights are your savior. Look for the "remote control" variants that stick to the underside of your desktop bridge. Aim them toward the wall to reduce glare on your screen, or upward if you want a soft, ambient wash.
For cable management, the "leg of the table" approach is messy. Instead, run a single surge protector power strip down the back of one of your modular units. If you are using wire grid shelving, zip-tie the power strip directly to the frame. This keeps cables off the floor and hidden behind the vertical structure. If your units are solid wood, use adhesive cord clips to run the power wire vertically down the inside leg of the unit, connecting to the nearest outlet.
Styling the Vertical Volume
With the structure in place, the "cloffice" can still look like a fort made of furniture. To elevate the aesthetic, fill the shelves intentionally. The top shelves are for lightweight, decorative storage—bins for extra printer paper or office supplies. Keep the bottom shelves relatively clear to avoid a claustrophobic feeling when you are sitting down.
The wall space above the desk is prime real estate, even if you can't paint it. Use 3M Command hooks to hang a magnetic board or a floating pegboard. This keeps your to-do lists and tools visible but off your precious desk surface.
I also recommend adding a tension rod inside the nook, above the desktop height, if your alcove has side walls. Hang a curtain that matches your curtains elsewhere in the apartment. When you clock out for the day, you can pull the curtain shut. This visual closure is critical for mental health in a studio apartment. It hides the clutter of the workday, allowing the alcove to revert to a simple architectural feature of your home.
Maintenance and Disassembly
The beauty of this system is its reversibility. When the lease is up, or if you simply want to reconfigure the room, the process is backward. Remove the desk bridge, unscrew or unclip the wire shelving, and roll up the rug pad. The wall remains untouched. The modular units can be broken down into flat packs and moved in a standard sedan, saving you the cost of hiring movers for heavy, built-in furniture.
This setup proves that you do not need a renovation budget to create a sophisticated workspace. You simply need to look at standard shelving not as storage, but as architecture. By treating these disparate components as a system, you gain a dedicated office without losing your security deposit.
Read next

Can You Achieve the 2026 'Quiet Luxury' Look Using Only IKEA Basics?
Discover how to curate a high-end, textural beige interior using strictly entry-level Swedish flatpacks without violating your lease.
4 High-End Designer Rugs and Their Exact Dupes Under $50
We analyzed the pile height and weave density of four coveted designer rugs to find four budget alternatives that pass the texture test.